Introduction
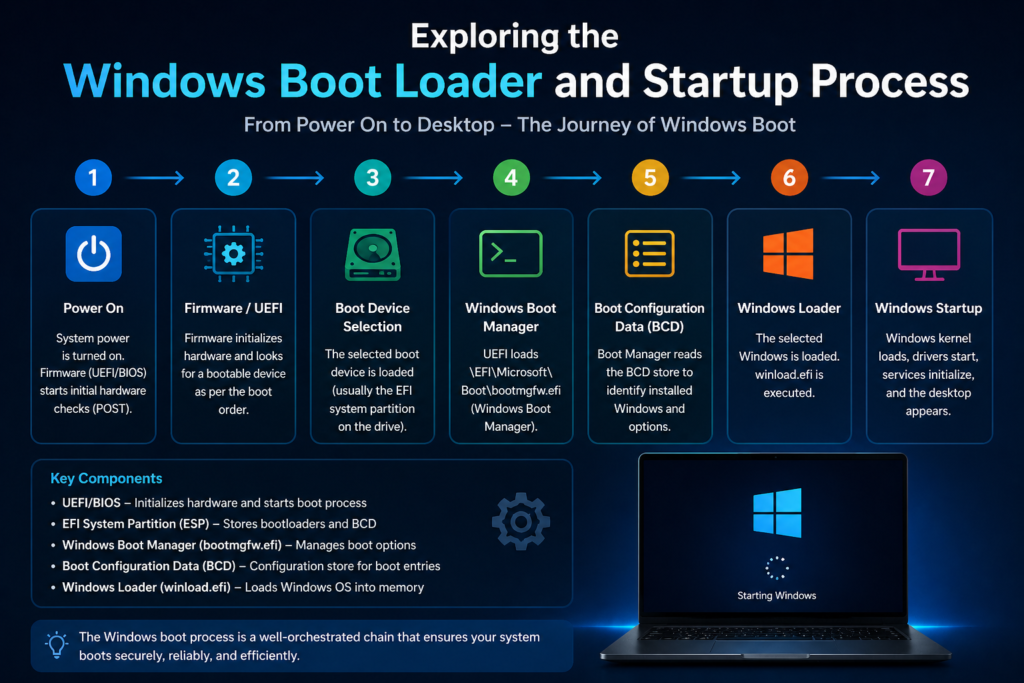
When you press the power button on your computer, a complex sequence of events begins within seconds. This sequence — known as the Windows boot process — prepares your hardware, loads essential system components, and finally brings you to the login screen.
Understanding how this process works helps you diagnose startup errors, improve performance, and troubleshoot boot failures more effectively. Whether you’re a beginner, IT student, or system administrator, knowing what happens behind the scenes gives you greater control over your system.
Why Understanding the Boot Process Matters
Most users only notice the boot process when something goes wrong — such as a slow startup, a boot loop, or error messages. However, learning how Windows starts offers several advantages:
- Helps troubleshoot startup issues
- Improves system optimization knowledge
- Makes BIOS/UEFI configuration easier
- Assists in understanding Secure Boot and recovery tools
- Builds foundational knowledge for IT careers
When you understand each stage of the boot sequence, identifying where a failure occurs becomes much simpler.
Overview of Windows Startup Sequence
The Windows startup process follows a structured path:
- Power is supplied to the system
- Firmware (BIOS or UEFI) initializes hardware
- Boot loader starts
- Windows OS loader loads the kernel
- System services and drivers start
- User login screen appears
Each stage depends on the previous one. If any step fails, Windows may not start properly.
Power On: What Happens First?
When you press the power button, the computer doesn’t immediately load Windows. Instead, it first activates internal hardware components.
The very first signal goes to the motherboard, which instructs the power supply to deliver electricity to all essential components — CPU, RAM, storage drives, and graphics hardware.
Role of the Power Supply
The Power Supply Unit (PSU) converts AC electricity from your wall outlet into low-voltage DC power suitable for computer components.
Its responsibilities include:
- Providing stable voltage to hardware
- Protecting components from power surges
- Sending a “Power Good” signal to the motherboard
Only after receiving this signal does the system proceed to the next stage of booting.
Hardware Initialization
Before Windows can load, your computer must ensure all hardware is functioning properly. This early hardware preparation is handled by firmware.
The system checks:
- CPU functionality
- RAM availability
- Keyboard and mouse detection
- Storage device presence
- Graphics output availability
This process ensures the system is ready to load the operating system.
BIOS vs UEFI
After hardware receives power, firmware takes control. Traditionally, this firmware was called BIOS, but modern systems now use UEFI.
Both serve the same core purpose — initializing hardware and starting the boot loader — but they differ significantly in design and capabilities.
What is BIOS?
BIOS (Basic Input/Output System) is legacy firmware on motherboards used for decades in personal computers.
Main characteristics:
- Stored on a motherboard chip
- Runs in 16-bit mode
- Supports MBR partitioning (up to 2TB drives)
- Limited user interface
BIOS performs the Power-On Self-Test (POST) and then hands control to the boot loader.
What is UEFI?
UEFI (Unified Extensible Firmware Interface) is the modern replacement for BIOS.
Key advantages:
- Supports GPT partitioning (large drives over 2TB)
- Faster boot times
- Secure Boot support
- Graphical interface with mouse support
- Better hardware compatibility
Most modern Windows 10 and Windows 11 systems use UEFI by default.
Key Differences Between BIOS and UEFI
| Feature | BIOS | UEFI |
|---|---|---|
| Boot Mode | Legacy | Modern |
| Partition Support | MBR (2TB limit) | GPT (No practical limit) |
| Interface | Text-based | Graphical |
| Boot Speed | Slower | Faster |
| Security | No Secure Boot | Supports Secure Boot |
In modern systems, UEFI is preferred due to improved security, flexibility, and performance.
POST (Power-On Self-Test)
After firmware (BIOS or UEFI) initializes basic hardware communication, the next critical step is POST (Power-On Self-Test). This is an automatic diagnostic process that ensures essential hardware components are functioning properly before the operating system loads.
POST acts as a safety checkpoint. If critical hardware fails at this stage, Windows will not start — preventing potential system corruption or further hardware damage.
POST is performed by the system firmware, whether it is legacy BIOS or modern UEFI.
Hardware Checks
During POST, the firmware performs a structured sequence of hardware tests. These checks happen very quickly — often within a few seconds — but they are essential for system stability.
1. CPU Check
- Verifies that the processor is installed correctly.
- Ensures the CPU can execute instructions.
- Checks internal CPU registers.
If the CPU fails, the system typically won’t power on properly.
2. RAM (Memory) Test
- Detects installed memory modules.
- Performs a quick memory integrity test.
- Confirms that RAM is accessible.
Memory failures are a common cause of POST errors.
3. Graphics Initialization
- Detects integrated or dedicated GPU.
- Enables display output so messages can appear on the screen.
If no graphics output is detected, you may see a blank screen even if the system powers on.
4. Keyboard & Input Devices
- Confirms keyboard availability.
- Some systems pause boot if no keyboard is detected (older systems especially).
5. Storage Device Detection
- Identifies connected SSDs or HDDs.
- Determines boot order priority.
- Prepares the selected drive for boot loading.
6. Peripheral Checks
- USB devices
- Network adapters
- Cooling fans and temperature sensors
If all checks pass, the system proceeds to the boot loader stage.
Common POST Errors
When POST detects a serious hardware issue, it alerts the user before continuing. These errors can appear as:
- Beep codes (on older systems)
- On-screen error messages
- LED indicator codes on the motherboard
1. RAM Errors
Symptoms:
- Continuous beeping
- No display output
- Random restarts
Solution:
- Reseat RAM modules
- Test memory sticks individually
- Replace faulty RAM
2. CMOS Battery Failure
Symptoms:
- BIOS settings reset
- Incorrect date and time
Solution:
- Replace the CMOS battery on the motherboard
3. No Boot Device Found
Symptoms:
- Message like “No bootable device detected.”
Solution:
- Check boot order
- Ensure the storage drive is connected properly
4. CPU Fan Error
Symptoms:
- The system stops booting
- Warning about CPU fan speed
Solution:
- Check the fan connection
- Clean dust buildup
POST errors must be resolved before Windows can begin loading.
Boot Loader Stage
Once POST successfully verifies hardware, control passes from firmware to the boot loader. This stage is responsible for finding and starting the operating system.
In modern Windows systems, this process is handled by the Windows Boot Manager.
The firmware reads boot configuration information from the system drive and launches the Windows boot environment.
What is the Windows Boot Manager?
Windows Boot Manager is a small but critical program that loads immediately after the firmware completes POST.
Its primary job is to:
- Locate the Windows operating system
- Display the boot menu (if multiple OS are installed)
- Pass control to the Windows OS loader
In UEFI systems, Windows Boot Manager is typically stored in the EFI System Partition (ESP).
In legacy BIOS systems, it resides in the system’s boot sector.
Without it, Windows cannot start.
Introduction to Windows Boot Manager
Windows Boot Manager was introduced with Windows Vista and replaced the older NTLDR system used in Windows XP.
It works closely with:
- Boot Configuration Data (BCD)
- Windows OS Loader (Winload.exe)
- Windows Recovery Environment
When your PC has multiple operating systems installed (for example, Windows 10 and Windows 11), Boot Manager displays a selection menu allowing you to choose which system to load.
If there is only one OS installed, this process happens silently in the background.
Boot Manager also plays an important role in:
- Advanced Startup Options
- Safe Mode access
- Recovery and troubleshooting
- Secure Boot validation (on UEFI systems)
Boot Configuration Data (BCD) Explained
Boot Configuration Data (BCD) is a database that stores boot-related settings and instructions.
Think of BCD as a roadmap that tells Windows Boot Manager:
- Where Windows is installed
- Which operating system to load
- What boot parameters to use
- Whether recovery mode is available
- Timeout settings for the boot menu
The BCD store replaced the old “boot.ini” file used in earlier Windows versions.
Where is BCD Stored?
- On BIOS systems: In the system reserved partition
- On UEFI systems: Inside the EFI System Partition
It is protected and not easily editable through normal file browsing.
How BCD Works
When the system starts:
- Firmware completes POST
- Windows Boot Manager launches
- Boot Manager reads the BCD store
- It identifies the correct Windows installation
- It launches Winload.exe to continue the boot process
If BCD becomes corrupted, you may see errors such as:
- “Boot Configuration Data file is missing.”
- “Windows failed to start.”
- Error code 0xc000000f
Managing BCD
Advanced users and IT professionals can manage BCD using the command-line tool:
bcdedit
This tool allows you to:
- Add or remove boot entries
- Modify default OS selection
- Change timeout values
- Enable advanced debugging options
However, incorrect modifications can make the system unbootable, so changes should be made carefully.
At this point in the boot process:
- Hardware has passed POST
- Windows Boot Manager has launched
- BCD has identified the correct OS
- The system is ready to load the Windows OS Loader
Next comes the stage where the Windows kernel and essential drivers begin loading — the foundation of the operating system itself.
Windows OS Loader
After Windows Boot Manager reads the Boot Configuration Data (BCD) and selects the correct operating system, the next critical component takes control: the Windows OS Loader.
The Windows OS Loader is responsible for preparing the core operating system environment before the graphical interface appears. It bridges the gap between the boot manager and the Windows kernel.
In modern Windows systems (Windows 10 and Windows 11), this role is handled by Winload.exe.
Role of Winload.exe
Winload.exe is the executable file that loads the essential components of Windows into memory.
Its responsibilities include:
- Loading the Windows kernel
- Loading the Hardware Abstraction Layer (HAL)
- Loading essential boot-start drivers
- Reading system registry data
- Passing control to the kernel
Without Winload.exe, Windows cannot transition from boot management to full operating system initialization.
What Exactly Does Winload.exe Load?
- Windows Kernel (ntoskrnl.exe)
- HAL (Hardware Abstraction Layer)
- Boot-critical drivers
- System registry hive (SYSTEM)
Once these components are loaded into RAM, control is transferred to the Windows kernel.
If Winload.exe becomes corrupted, you may see errors like:
- “Windows failed to start.”
- “Winload.exe missing or corrupt.t”
- Error code 0xc000000e
In such cases, repair tools like Startup Repair or rebuilding BCD are often required.
Loading Essential Drivers
Before the kernel fully takes control, certain drivers must be loaded to ensure the system can access hardware properly.
These are called boot-start drivers.
Examples of Essential Drivers:
- Disk controller drivers (for SSD/HDD access)
- File system drivers (NTFS support)
- Basic system bus drivers
- Security drivers required for Secure Boot
These drivers are necessary because Windows must be able to:
- Access the system drive
- Read system files
- Communicate with hardware components
If a critical driver fails to load, Windows may stop with a Blue Screen error early in the startup process.
At this stage, the system is still running in a minimal environment — only essential services are active.
Kernel Initialization
After Winload.exe successfully loads the necessary components into memory, control is transferred to the Windows kernel.
This marks the true beginning of the operating system.
The kernel initializes:
- Memory management systems
- Process scheduling
- Security subsystems
- Hardware communication layers
- System services
Once the kernel starts, Windows transitions from boot mode into full system initialization.
What is the Windows Kernel?
The Windows kernel is the core of the operating system. It is responsible for managing:
- CPU operations
- Memory allocation
- Hardware communication
- System processes
- Security enforcement
Without the kernel, Windows cannot function.
The kernel operates in kernel mode, which has full access to hardware and system memory — unlike user applications, which run in user mode with restricted access.
Introduction to Windows NT Kernel
Modern versions of Windows (including Windows 10 and Windows 11) are built on the Windows NT architecture.
The Windows NT kernel was first introduced in 1993 and was designed for:
- Stability
- Security
- Multi-user environments
- Enterprise-level scalability
Key features of the Windows NT kernel include:
- Preemptive multitasking
- Advanced memory protection
- Hardware abstraction
- Modular driver support
- Security reference monitor
This architecture is why modern Windows systems are far more stable than early consumer versions like Windows 95 or 98.
Hardware Abstraction Layer (HAL)
The Hardware Abstraction Layer (HAL) is a critical component loaded alongside the kernel.
HAL acts as a bridge between:
- The operating system
- The physical hardware
Instead of the kernel directly communicating with every hardware device, it communicates through HAL.
Why HAL Is Important:
- Allows Windows to run on different hardware platforms
- Simplifies driver development
- Improves system compatibility
- Reduces hardware-specific complexity
For example, different motherboards may handle interrupts differently. HAL standardizes this process so the kernel does not need to know hardware-specific details.
This design is one of the key reasons Windows can operate on millions of hardware combinations.
System Registry Loading
During early kernel initialization, Windows loads critical configuration settings from the system registry.
The registry is a hierarchical database that stores:
- System configuration
- Driver settings
- Service startup information
- Hardware profiles
- Security policies
Without registry data, Windows would not know which services to start or how hardware should behave.
What is the Windows Registry?
The Windows Registry is a structured database used to store low-level system and application settings.
It replaces older configuration files used in early operating systems.
The registry contains:
- System-wide settings
- User-specific preferences
- Installed software configurations
- Device driver parameters
It is organized into logical sections called “hives.”
Important Registry Hives During Boot
Not all registry hives are loaded at the very beginning of startup. Only essential ones are initialized during boot.
1. SYSTEM Hive
- Contains driver and service configuration
- Defines which drivers start during boot
- Critical for hardware communication
This is the most important hive during startup.
2. HARDWARE Hive
- Created dynamically during boot
- Stores detected hardware information
- Built based on firmware data
3. SAM (Security Accounts Manager)
- Manages user authentication data
- Required for login validation
4. SECURITY Hive
- Contains local security policies
- Controls system permissions
5. DEFAULT Hive
- Stores default user profile settings
During early startup, the SYSTEM hive is loaded first because it determines:
- Which services start automatically
- Which drivers are boot-critical
- System control set selection
If the SYSTEM hive becomes corrupted, Windows may fail to boot and display errors like:
- “System registry file is missing or corrupt.”
At this stage of the Windows boot process:
- Winload.exe has finished its job
- The Windows NT kernel is running
- HAL is active
- Essential drivers are loaded
- Critical registry hives are initialized
The operating system core is now active and ready to start system services, user sessions, and eventually display the login screen.
Session Manager & Services Startup
After the kernel and registry are initialized, Windows moves to the session initialization phase. This stage prepares the system environment required for user interaction.
Role of Session Manager (Smss.exe)
Smss.exe (Session Manager Subsystem) is the first user-mode process started by the kernel.
Its main tasks:
- Creates system sessions
- Starts essential system processes
- Initializes paging files
- Launches the Windows subsystem
If Smss.exe fails, Windows cannot continue booting.
Starting System Services
Next, the Service Control Manager (SCM) starts background services configured as “automatic.”
Examples include:
- Networking services
- Windows Update
- Security services
- Event logging
Only critical services load at first; others may start after login.
Winlogon Process
After services initialize, Windows launches Winlogon.exe.
Winlogon is responsible for:
- Displaying the login screen
- Handling secure attention sequence (Ctrl + Alt + Del)
- Managing user authentication
- Starting the user shell after login
This is the stage where you first see the Windows sign-in screen.
User Logon Process
Once the login screen appears, the system waits for user credentials.
Credential Verification
When you enter your password, PIN, or biometric input:
- Credentials are verified locally or through a Microsoft/domain account
- Security policies are checked
- Access rights are validated
If authentication fails, login is denied.
Loading User Profile
After successful verification:
- Windows loads the user’s profile from disk
- Registry settings (NTUSER.DAT) are applied
- Personalized configurations are activated
This ensures each user gets their own desktop environment.
Desktop Environment Initialization
Finally:
- Explorer.exe (Windows shell) starts
- Taskbar and Start menu load
- System tray icons appear
At this point, Windows is fully operational.
Startup Programs & Background Services
Even after the desktop appears, startup items continue loading in the background.
How Startup Apps Load
Startup programs can launch from:
- Task Manager Startup tab
- Registry Run keys
- Startup folder
- Scheduled tasks
Too many startup apps can slow boot time.
Managing Startup for Faster Boot
To improve startup speed:
- Disable unnecessary apps in Task Manager
- Remove unused scheduled tasks
- Uninstall unwanted software
Reducing startup load improves boot performance significantly.
Secure Boot Explained
Secure Boot is a modern security feature available on systems using UEFI firmware.
What is Secure Boot?
Secure Boot ensures that only digitally signed and trusted software loads during startup.
It prevents:
- Rootkits
- Bootkits
- Unauthorized bootloaders
How UEFI Secure Boot Protects Your System
During boot:
- Firmware verifies digital signatures
- Only trusted boot components are executed
- Tampered or unsigned software is blocked
This protects the system before Windows even starts.
Common Boot Problems & Fixes
Boot failures can occur at different stages of the startup process.
Boot Loop Issues
Symptoms:
- PC restarts repeatedly
- Windows logo appears, then restarts
Causes:
- Corrupted drivers
- Faulty updates
- Registry damage
Fix:
- Boot into Safe Mode
- Use Startup Repair
- Uninstall recent updates
Missing Boot Manager Error
You may see:
“Bootmgr is missing” or similar errors related to Windows Boot Manager.
Causes:
- Corrupted BCD
- Incorrect boot order
- Damaged system partition
Fix:
- Repair BCD using recovery tools
- Check BIOS/UEFI boot settings
Using Windows Recovery Environment
The Windows Recovery Environment (WinRE) provides tools to fix startup problems.
It allows you to:
- Run Startup Repair
- Perform System Restore
- Access Command Prompt
- Reset the PC
WinRE can be accessed by interrupting the boot multiple times or using installation media.
At this final stage, the Windows boot process is complete — from power-on to a fully loaded desktop — with multiple security and recovery layers ensuring system stability and protection. Advanced Boot Options.
Advanced Boot Options provide troubleshooting tools when Windows fails to start normally. These options are accessible through the Windows Recovery Environment (WinRE) or by holding Shift while selecting Restart.
They allow you to diagnose, repair, and recover your system without fully loading Windows.
Safe Mode
Safe Mode starts Windows with only essential drivers and services.
It is useful when:
- A faulty driver causes crashes
- Malware prevents normal startup
- A recent update breaks the system
Types of Safe Mode:
- Safe Mode – Minimal drivers
- Safe Mode with Networking – Includes internet access
- Safe Mode with Command Prompt – Text-based troubleshooting
Safe Mode helps isolate problems by preventing unnecessary software from loading.
Startup Repair
Startup Repair automatically scans and fixes issues that prevent Windows from booting.
It can repair:
- Missing or corrupted boot files
- Damaged Boot Configuration Data (BCD)
- Certain registry issues
This tool is especially helpful when you see errors related to Windows Boot Manager or startup configuration problems.
System Restore
System Restore allows you to revert your system to a previous working state using restore points.
It restores:
- System files
- Drivers
- Registry settings
It does not delete personal files, making it a safe recovery option when recent changes cause instability.
Conclusion
Recap of the Windows Boot Process
The Windows boot process follows a structured sequence:
- Power is supplied to the hardware
- Firmware (BIOS/UEFI) initializes devices
- POST verifies hardware
- Windows Boot Manager loads
- OS Loader starts the kernel
- Drivers and registry settings are initialized
- Services and sessions begin
- User logs in, and the desktop loads
Each stage builds on the previous one to ensure stability and security.
Why This Knowledge is Important
Understanding the Windows boot process helps you:
- Diagnose startup failures
- Fix boot errors confidently
- Improve system performance
- Strengthen system security awareness
- Build foundational IT knowledge
When you know what happens behind the scenes, troubleshooting becomes logical instead of confusing.
A clear understanding of the boot process turns you from a basic user into a more confident and capable Windows problem-solver.